Tampilkan postingan dengan label quick craft projects. Tampilkan semua postingan
Tampilkan postingan dengan label quick craft projects. Tampilkan semua postingan
Under an hour craft project! Week 1: Memo board
So I wanted to share with you an idea I'm always trying to put into practice; making things in a short amount of time. In the 21st century we all seem to lead our lives at the speed of light, and as nice as it is to work on projects that take time (I'm a big advocate of this), it's not always possible. For me, one of the things I love about crafting, and that keeps me motivated is a sense of achievement. So I try to keep a balance of working on big projects where the results will pay off but will take some time, and what I call "short term wins"; projects that you can quickly knock up and get that crafting 'kick'.
In order to share this idea, I'll be trying to post regular 'under an hour' projects I've worked on for you to have a go at too or at least give you a bit of inspiration for your own!
This week I decided to make an incredibly easy (but very stylish) memo board!
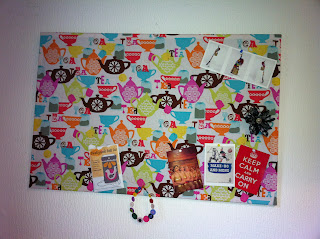
First of all you need to decide what fabric will best suit your memo board. The best way to do this is to cover the board, or pin the fabric to it so you can get an idea. Here were a few of my possible choices:


I decided to go for the Michael Miller teapot fabric I bought a while back as it was bright and cheery.


Tips
The memo boards I was looking at a few months ago, had used ribbon running diagonally across them so you could slip in pieces of paper. In the end I decided I preferred mine plain, but you could easily add lines of ribbon for a bit more "functionality" and (yes I'm really going to use this word...) pizazz!


Enjoy!
READ MORE - Under an hour craft project! Week 1: Memo board
In order to share this idea, I'll be trying to post regular 'under an hour' projects I've worked on for you to have a go at too or at least give you a bit of inspiration for your own!
This week I decided to make an incredibly easy (but very stylish) memo board!

You will need:
- A cork board (I bought mine from Rymans for £9.99 but you could easily pick these up at a car boot or charity shop for cheaper, or make it yourself with some board and wadding.)
- A piece of fabric of your choice (allow for 2 inch seam allowance)
- A staple gun
- Drawing pins
- Scissors
First of all you need to decide what fabric will best suit your memo board. The best way to do this is to cover the board, or pin the fabric to it so you can get an idea. Here were a few of my possible choices:

I decided to go for the Michael Miller teapot fabric I bought a while back as it was bright and cheery.
- Make sure before doing anything that you iron your fabric. I know, I know...it's boring...but it's much better than having nasty creases down your memo board at the end!
- Place your fabric wrong side up and place the cork board in the centre.

- Fold one side of the fabric over the board and pin using drawing pins. Repeat on the opposite side.
- You are now ready to staple!

- When it comes to stapling, I'd recommend keeping the staples few and far between at first. This way if the fabric is on the wonk or you make a mistake you can easily take them out without wanting to throw the whole thing out of the window.

- Once you have stapled both the two opposites sides, you can start on the last two. In order to do this, think of it like wrapping a present. Fold the two corners in and over - like an envelope.


- Finally, pin the fabric in place, and making sure you pull the fabric tight - staple the fabric in place.

- And your memo board is complete! Simply pop in some picture hooks on the back with some picture wire and mount it on your wall!

Tips
The memo boards I was looking at a few months ago, had used ribbon running diagonally across them so you could slip in pieces of paper. In the end I decided I preferred mine plain, but you could easily add lines of ribbon for a bit more "functionality" and (yes I'm really going to use this word...) pizazz!


The result!
Once you have your memo board up on the wall, you can get down to the most important part; filling it full of your pretty finds, ideas and (if you are anything like me) hoards of lists!

Under an Hour Tutorial: iPhone/iPod Case
Want a quick and easy tutorial that will take you under an hour to make? A cover for your iPhone (or any other mobile phone of your choice) or iPod (yes yes, or other similarly shaped mp3 player) is the perfect thing to make. This took me no longer than 45 minutes to make (not including embroidery I hasten to add!)


READ MORE - Under an Hour Tutorial: iPhone/iPod Case

You will need:
- A plain cotton fabric - cut to 2 rectangles measuring 9.5cm x 15 1/2cm
- A patterned fabric for the strip - 2 thin rectangles measuring 9.5cm x 3cm
- A piece of embroidery (I'd recently worked on this octopus and had him lying around - but you could easily knock something up or just do a simple applique design)
- A matching button

Step 1
In order to have a nice clean edge on the opening of your iPhone cover, create a hem. Fold down 1 cm at the top of the back and front of the cover (the large rectangles). Pin in place.

Step 2
You may want to sew at each stage - but I prefer to pin everything first and do all the sewing together.
Next, you want to pin on the stripe of fabric in a contrasting colour. In order to get a neat edge fold down about 1/2cm of each rectangle and pin in place.

Step 3
Pin on your main decoration. Again, fold around 1/2cm around all of the edges to get a neat finish.


Step 4
Now you need to get sewing! Choose a matching thread and sew on the main decoration. Keep quite close to the edge.


Step 5
Straight stitch the top hem and your contrasting strip on both the front and back of your cover.


Step 6
Time to put it together! With right sides facing pin in place and sew the sides and bottom leaving the hemmed top open.

Step 7
Turn the fabric inside out - I always find using a knitting needle to poke out the corners works wonders!
Step 8
Sew on your button. This is purely for decoration but looks so cute!

Your iPhone/iPod cover is complete!


Tips
- I made this cover quite big so I could use it for either my phone or my iPod. If you wanted to use it just as a phone cover I'd suggest making it slightly narrower.
- You could easily have a "working" button either by making a button hole or by looping some thin elastic from the back to the front in a hoop.
There are loads of ways to customise this cover - and it's so quick to make. I think it could easily be done in 30 minutes!
Langganan:
Postingan (Atom)


